Tyco Radiant Underfloor Heating System 120 V Complete
- Primary or Secondary Heat Source
- Simple and Fast Installation
- Suitable for Most Subfloors - Solid, Wood and Isolation Membrane
- Maintenance Free
- 15 Year Warranty with Proper Installation
- 10 Square Feet to 100 Square Feet


Tyco Radiant Underfloor Heating 120 V Complete System Includes
- Your Choice of 120V Heating Mat Size
- Programmable Thermostat
- Floor Sensor
QuickNet Floor Heating System
for your home
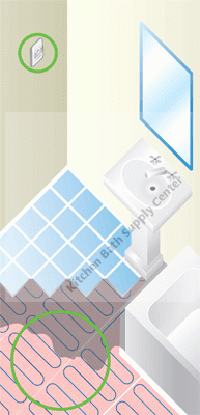
With the Raychem QuickNet electric floor heating system, we’re putting slippers out of business. Simply install the QuickNet heating cable between the ceramic tile or natural stone and the subfloor and enjoy true warmth and comfort in your home.
- Simple and Fast Installation
- Adds Less Than 3/16" (3 mm) to Finished Floor Level
- Suitable for Most Subfloors - Solid, Wood and Isolation Membrane
- Fits Any Room Size and Shape
- Pre-spaced for Guaranteed Heat Output
- Primary or Secondary Heat Source
- Maintenance Free
- 15 Year Warranty with Proper Installation
What is QuickNet?
Raychem QuickNet is an electric floor heating system for installation directly under ceramic tiles or natural stone. It provides ideal comfort heating in your bathroom, kitchen, entryway or other tiled areas. QuickNet’s compatibility with all standard subflooring materials and its low 3/16 inch (3 mm) profile, make it ideal for renovation as well.
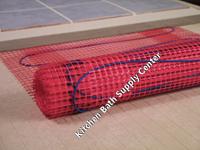
The QuickNet floor heating system includes a blue heating cable woven into an adhesive-backed red fiberglass mesh that allows for simple roll-out installation without worrying about heating cable spacing.
The floor heating mats are pre-terminated for use with 120 and 240 volts and are available in various lengths of 20 inch (50 mm) widths. The mats emit no measurable electromagnetic fields due to the shielded dual conductor design and require only one cold lead connection, making it easy to layout and install.
Improve your comfort and save on heating costs
Heating cost is a significant part of the household budget. By installing a floor heating system, you turn a small investment into real cost-savings. With QuickNet, you can lower the room temperature by a few degrees and enjoy the same level of comfort as a warmer room without floor heating.
The QuickNet advantages:
- Can be customized at job site to fit heated area
- Ideal for renovation
- Low profile installation only 3/16 inch (3 mm) thick
- Adhesive backing for ease of installation
- Includes programmable thermostat
- Dual conductor heating cable allows for only one cold lead connection
- Built-in ground-fault protection (GFCI)
- Compatible with all standard subflooring materials
- No measurable electromagnetic fields
- Long life and maintenance free
Works With Ceramic Floor Tile, Marble, Slate
TycoRaychem underfloor heating works very well with all types of ceramic and stone-based floor surfaces, since these offer minimum resistance to heat transfer. The normal surface temperature of ceramic floor surfaces is slightly lower than room temperature, which is often 20-30 degrees less than body temperature. This results in the floor felling very cool to the touch.
TycoRaychem underfloor heating systems efficiently remove this uncomfortable chill. The programmable thermostat will keep your floor at your desired comfort level - never hot, just comfortable.
Choosing the Correct QuickNet
- Select the QuickNet floor heating mat that is no larger than the heated area.
- The heated area is the area of the floor that does not include permanent fixtures such as cabinets, toilets, sinks or tubs.
- For example, if your heated area is 74 square feet, select the 70 square feet QuickNet.
- The selected mat can be configured to fit the shape of the area to be heated.
5 Easy Steps to Installation
Before You Begin
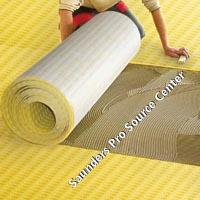
We recommend first installing a quality isolation membrane underlayment like Dural Durabase CI or ProVa-flex. This will ensure proper isolation of your tile and heating layers from the substrate.
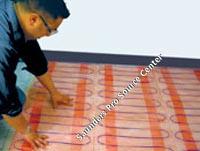
Step 1
Roll out QuickNet mat. Cut mesh and turn mat to fit heated space. Do not cut heating element.
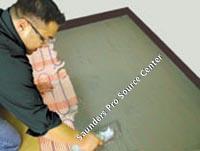
Step 2
Apply leveling coat.
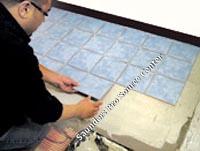
Step 3
Install tile.
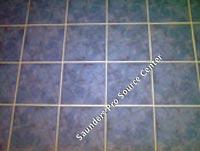
Step 4
Apply Grout.
Previous Posts
Double-leg Inside Corner for Schluter RONDEC - Anodized Aluminum
Mark E Quick-Pitch Standard Float Sticks
End Cap for Schluter TREP-SE/-S
Dural Duraplus Box Section Transition Profiles Aluminum Anodized
Rubber Insert Replacement for Schluter DILEX-KSN
Dural Durosol Square Edge Profile Aluminum Beige Powder Coated
Inside Corner for Schluter RONDEC-STEP
Schluter DITRA-HEAT-E-RS Non-Programmable Thermostat
End Cap for Schluter DILEX-EHK/-HKS
Schluter DECO Tile Edge Protection / Decorative Profiles
Dural Durosol Square Edge Profile PVC Beige
Inside Corner for Schluter DILEX-AHKA
Dural Duralis Listello Deco Aluminum Profiles 1 Inch
Dural Duralis Listello Deco Brushed Stainless Steel Profiles
Schluter BARA-RTP Balcony Gutter System Edging Profiles